Table of Contents
Installing Codabix
Codabix is available for the following operating systems and hardware configurations:
- Codabix for Windows (x64, Arm64)
- Codabix for Linux (x64, Arm64, Arm32)
Codabix for Windows
The current version of Codabix for Windows requires a 64-bit version (x64, Arm64) of Windows 10 Version 1607 or Windows Server 2016, or higher.
System Requirements
Supported Operating Systems
Codabix for Windows is supported on the following operating systems (architectures x64 and Arm64):
| Windows Version | Workstation Operating System | Server Operating System |
|---|---|---|
| 10.0.14393 | Windows 10 [IoT] Enterprise 2016 LTSB | Windows Server 2016 (Option “Server with Desktop Experience”) |
| 10.0.17763 | Windows 10 [IoT] Enterprise LTSC 2019 | Windows Server 2019 (Option “Server with Desktop Experience”, or “Server Core” with Server Core App Compatibility FOD installed) |
| 10.0.19044 | Windows 10 Version 21H2 (November 2021 Update) | |
| 10.0.19045 | Windows 10 Version 22H2 (2022 Update) | |
| 10.0.20348 | Windows Server 2022 (Option “Server with Desktop Experience”, or “Server Core” with Server Core App Compatibility FOD installed) | |
| 10.0.22000 | Windows 11 Version 21H2 | |
| 10.0.22621 | Windows 11 Version 22H2 (2022 Update) | |
| 10.0.22631 | Windows 11 Version 23H2 (2023 Update) |
Hardware Requirements
Recommended: 64-bit Quad-Core CPU, 8 GB RAM
Back-end Database Requirements
By default, Codabix uses an embedded database (SQLite) which doesn't have any additional requirements.
However, if you plan on using MySQL, MariaDB, or Microsoft SQL Server as a back-end database, please make sure it is MySQL 8.0 or higher, MariaDB 10.3 or higher, or Microsoft SQL Server 2014 or higher.
We recommend running MySQL/MariaDB/MSSQL on the same machine as Codabix.
Codabix Setup and First Start
Codabix Setup
In order to install Codabix, download and run the Codabix installer (MSI file). You can select which Plugins are to be installed with Codabix.

Install and Uninstall Plugins
If you want to change your Codabix installation at a later time (e.g. to remove or add plugins), simply start the Codabix Installer again (alternatively, you can also open the Windows Control Panel, click on “Programs and Features”, select “Codabix” and click “Change”).
You can then click “Change” in the installer to change the Codabix plugins to be installed or uninstalled.
Updating Codabix
When you have already installed Codabix and want to update to a newer version, you don't need to uninstall the older version. Simply run the Codabix Installer of the newer version, and it will automatically update Codabix.
Note: If you had installed Codabix as a service, you will need to reinstall the service in the Codabix Settings dialog after the update.
First Start
You can start Codabix by double-clicking the Codabix shortcut ![]() on the Desktop, or by running the following command on the command line (e.g. on Windows Server Core):
on the Desktop, or by running the following command on the command line (e.g. on Windows Server Core):
"%ProgramFiles%\Traeger\Codabix\codabix-ui.exe"
The first time you start Codabix, you will be asked to specify a project directory (best would be an empty folder) where Codabix will be allowed to store its data (settings, database, configuration, logfiles etc).
After you confirm the selection, the Settings Dialog (see next section) will appear. Click OK to apply the settings. Then, a dialog box will ask you to set an admin password. You will need this password later for the configuration.
Note: A dialog of the Windows Firewall may appear asking to allow access to Codabix. This is caused by the OPC UA Server Plugin, which creates an OPC UA Server at port 4840 by default. If you click on “Allow access”, other machines in the network may access this OPC Server.

After you have set the passwort and Codabix has started, the Web Configuration login screen appears. You can now log in with the username admin and your previously set password.

Codabix Project Settings
 ) which opens the Codabix settings dialog.
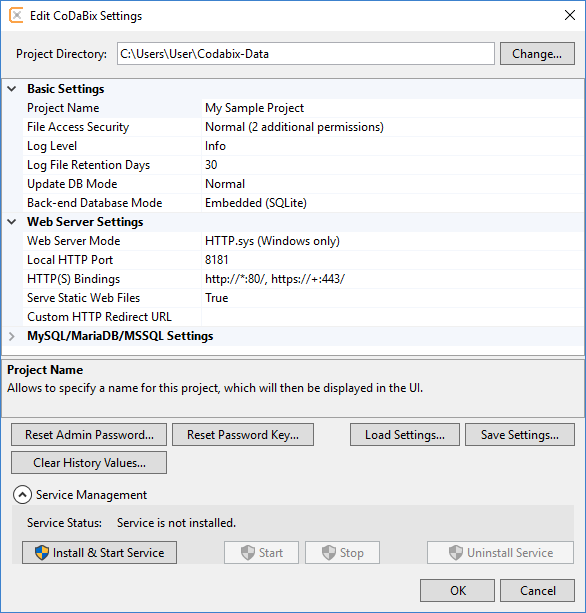
Basic Settings
| Setting Name | Description |
|---|---|
| Project Directory | The project directory specifies the folder where Codabix stores the project settings (all of the following settings), the back-end database (if Back-end Database Mode is set to “Embedded (SQLite)”), log files and configuration files for the plugins. It can be retrieved using the environment variable %CodabixProjectDir%, e.g. in Scripts. It contains the following folders: • log: Contains the Codabix runtime log files and log files from the Entity Model. • plugins: Contains configuration files for plugins. • webfiles: In this folder, you can place static files that should be accessible through the embedded Codabix web server for URLs starting with /webfiles/, if the setting Serve Static Web Files is enabled. • dashboard: Similar to webfiles, but for URLs starting with /dashboard/ in order to override the embedded Dashboard and use your own one. • userdata: You can place custom files in this folder (e.g. for use by Scripts). This folder is guaranteed to not be used differently in future Codabix versions. When creating a backup, the contents of these subfolders will be included in the backup. |
| Project Name | Allows you to specify a name for the current project, which will be displayed in the Codabix application's title bar and used for the default backup file name. |
| Access Security | Within Codabix, the project logic can access files on your system by creating File Nodes (and then accessing them using the HTTP Access URL or using an OPC UA Client), or by creating a Script that uses the io.file and io.directory namespaces, or using plugins such as XML Exchange. To prevent a user that has the Codabix admin password (or is able to create Scripts or File Nodes in Codabix) from accessing arbitrary files on the system (especially when running as a service), you can allow or deny access to specific paths. Furthermore, you can define alternative access credentials to be used when accessing the path (which is done by impersonation), or additionally add the path as a network resource. By default, level Normal is set wich permits the folders plugins, log, userdata, webfiles, dashboard within the project directory for read/write access. You can define additional directory/file paths to which read or write access should be allowed. |
| Log Level | Specifies the detail level of logging which Codabix shall use when writing logfiles. Only those log entries are written that have at least a severity of this level. 'Off' means no logfiles are created. |
| Back-end Database Mode | Specifies which back-end database to use. By default, Codabix uses an embedded database (SQLite) which doesn't need any configuration. The embedded database will be stored in the files codabixdb.db and codabixhistorydb.db in the specified project directory. However, for better performance you can also use MySQL 8.0 or higher, MariaDB 10.3 or higher, or Microsoft SQL Server 2014 or higher (with SQL Server Authentication) as a back-end database. If you select “MySQL/MariaDB” or “Microsoft SQL Server”, you will need to fill in the settings grouped under the “MySQL/MariaDB/MSSQL Settings” category. When creating a backup, the contents of the back-end database will be included in the backup. You can also migrate the current back-end database from SQLite to MySQL/MariaDB/MSSQL (or MySQL/MariaDB/MSSQL to SQLite) by creating a backup, switching the Database Mode and then restoring the backup. |
Web Server Settings
| Setting Name | Description |
|---|---|
| Web Server Mode | Specifies the mode of the embedded web server that Codabix uses in order to provide the Codabix Web Configuration, the Dashboards app, the REST/SignalR Interface, registered Script HTTP Handlers and optionally user-provided static files. Kestrel is built on socket APIs and is used by default as it generally provides the best performance. When using HTTPS, SSL certificates need to be provided as PFX (PKCS #12) files ( .pfx, .p12) and will be stored in the Codabix Settings file (encrypted with the project’s password key). The Windows HTTP Server API (HTTP.sys) is supported on Windows, and allows to share ports with other IIS web sites. When using HTTPS, SSL certificates need to be placed in the Windows Certificate Store (see below). In order to use remote bindings, Codabix will need to be installed as a service. |
| Local HTTP Port | Specifies the TCP port on which the embedded web server listens for local (loopback) connections. By default, Codabix uses the port 8181. Optionally, this port can also be used as remote HTTP Binding. Note: When you use Windows HTTP Server API as Web Server Mode and you want to use ports ≤ 1024 (e.g. port 80), or you want to access the Codabix Web Configuration, the Dashboards app, or the REST/SignalR Interface from other machines on the network (and you have enabled the option “Use the Local Port as remote HTTP Binding” for this in the “HTTP(S) Bindings” options), you need to install Codabix as a service (see below). Otherwise, only ports > 1024 are allowed and only the local machine can access Codabix via HTTP. |
| HTTP(S) Bindings | You can enable HTTP and HTTPS bindings, containing the hostname, port and the SSL certificate (for HTTPS), for remote connections. This allows you to connect to Codabix from remote machines, optionally over an authenticated and encrypted TLS connection. Note: To use a SSL certificate for Windows HTTP Server API Web Server Mode, it must be stored in the Personal or Web Hosting Certificate Store of the Local Computer account in Windows and you must have a private key for the certificate. Intermediate certificates (also called CA Cert) must be stored in the Intermediate Certificate Authorities Store. To manage certificates in Windows, you can use MMC by running certlm.msc and then opening the Personal folder (or Web Hosting, resp.) for your certificate and the Intermediate Certificate Authorities folder for your intermediate certificates or you can use PowerShell by switching to the path Cert:\LocalMachine\My (or Cert:\LocalMachine\WebHosting) for your certificate and Cert:\LocalMachine\CA for your intermediate certificates. |
| Serve Static Web Files | If enabled, the embedded web server will serve static files placed in the webfiles folder of the project directory for URLs starting with /webfiles/. This allows you in combination with the Script HTTP Handler feature to develop Web Apps served by Codabix (e.g for visualization). |
| Custom HTTP Redirect URL | If not specified, requests for the root path (/) will be redirected to the Codabix Web Configuration. Alternatively, you can specify a custom redirect URL. This is useful if you want users to directly get to your custom Web App served by the embedded web server, when entering the Codabix address in their browser. |
MySQL/MariaDB/MSSQL Settings
(applies only if Back-end Database Mode is “MySQL/MariaDB” or “Microsoft SQL Server”)
| Setting Name | Description |
|---|---|
| Hostname | Specifies the hostname of the MySQL/MariaDB/MSSQL server. When using MSSQL and the port is empty, this will be interpreted as data soure (e.g. <ComputerName>\<InstanceName>). Otherwise, this is the hostname for TCP connections. |
| Port | Specifies the TCP port of the MySQL/MariaDB/MSSQL server. Can be empty to use the default port (for MySQL/MariaDB) or to use the hostname as data source (for MSSQL). |
| Database Name | Specifies the database name which Codabix shall use on the MySQL/MariaDB/MSSQL server. If the specified database does not exist, Codabix will automatically create the database and the necessary tables when applying the project settings. |
| User Name | Specifies the username which Codabix shall use to connect to the MySQL/MariaDB/MSSQL Server. |
| Password | Specifies the password for the username. |
Installing Codabix as a Service
You can install Codabix as a service. This allows you to run Codabix automatically and permanently in the background (like on a Server) without having to explicitely start the Codabix application.
After opening the Codabix settings dialog by clicking on the gear toolbar item at the top right (), it will show the section “Service Management” that allows you to install, start, stop and uninstall Codabix as a service:

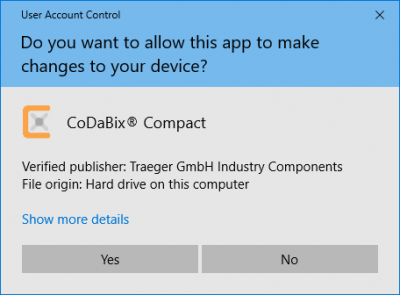
You can install and start Codabix as a service by clicking the “Install + Start Service” button. This will show an UAC dialog (because installing a service requires administrator rights).
To uninstall the service, click the “Uninstall Service” button.
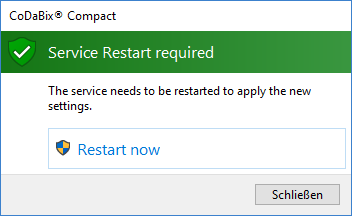
Note: When you change a setting like the project directory or the HTTP port while Codabix is running as a service, the service needs to be restarted (or reinstalled) to apply the new settings. This is indicated by the following dialog that lets you restart/reinstall the service:
Note: The service is configured to automatically restart after a failure. This ensures Codabix can restart in a clean, defined state after a serious error has occured.
License Management
Machine Code
When you order a Codabix license, you will need to provide the machine code for the machine where Codabix is running.
To get the machine code, in the Codabix application click on the key symbol (![]() ) to open the license dialog. Then, click on the button “Copy Machine Code” to copy the local machine code into the clipboard.
) to open the license dialog. Then, click on the button “Copy Machine Code” to copy the local machine code into the clipboard.

Codabix for Linux
System Requirements
Supported Operating Systems
Codabix for Linux is supported on the following Linux distributions:
- Debian 11 (Bullseye) or higher (x64, Arm64, Arm32)
- including derivates such as Raspberry Pi OS (for Raspberry Pi)
- Ubuntu 20.04 or higher (x64, Arm64)
- Fedora 37 or higher (x64)
- OpenSUSE Leap 15.0 or higher (x64)
Hardware Requirements
- Raspberry Pi:
- Codabix for Linux (Arm64) can run on a Raspberry Pi 4 or newer (with a 64-bit OS, with at least 2 GB RAM).
- Codabix for Linux (Arm32) can run on a Raspberry Pi 3 or newer.
- For optimal performance, we recommend running Codabix (Arm64) on a Raspberry Pi 4 (or newer) with 4 GB or 8 GB RAM, using an 64-bit OS.
- Other machines:
- Recommended: 64-bit Quad-Core CPU (x64/Arm64), 8 GB RAM, 64-Bit OS and Codabix
Back-end Database Requirements
By default, Codabix uses an embedded database (SQLite) which doesn't have any additional requirements.
However, if you plan on using MySQL, MariaDB, or Microsoft SQL Server as a back-end database, please make sure it is MySQL 8.0 or higher, MariaDB 10.3 or higher, or Microsoft SQL Server 2014 or higher.
Unsupported Features
Some features are currently not available in Codabix for Linux. This includes:
- Windows-only plugins like Melsec QJ Device Plugin, H1 Device Plugin, AKLAN Device Plugin
- Accessing OPC Classic (COM) Servers using the OPC UA Client Device Plugin
- User authentication via Active Directory
- Impersonation for files with different credentials (or establishing SMB network connections), e.g. for File Nodes or when using the CSV Exchange Plugin
- GUI window (you can open the Codabix Web Configuration in a browser, but administrative tasks like setting the Project Directory, installing the service etc. need to be done in the Codabix Shell console application)
Installing Codabix and First Start
Installing Codabix for Linux
To install Codabix for Linux, download the .setup file and execute the following command to make the file executable:chmod +x codabix-<platform>-<release-date>-<release-version>.setup
Start the setup by typing:
sudo ./codabix-<platform>-<release-date>-<release-version>.setup
The setup will guide you through the installation.
Older installations of Codabix will not be removed to enable a later roll-back. The database backup that is needed for such a roll-back can be created during the setup.
First Start
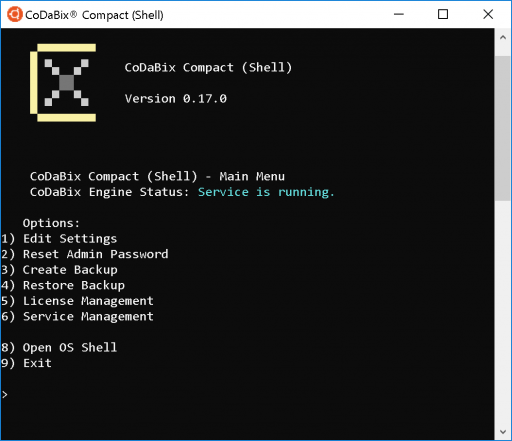
To start the console-based Codabix Shell, run the following command:codabix
- Codabix should now be starting and ask for a project directory:
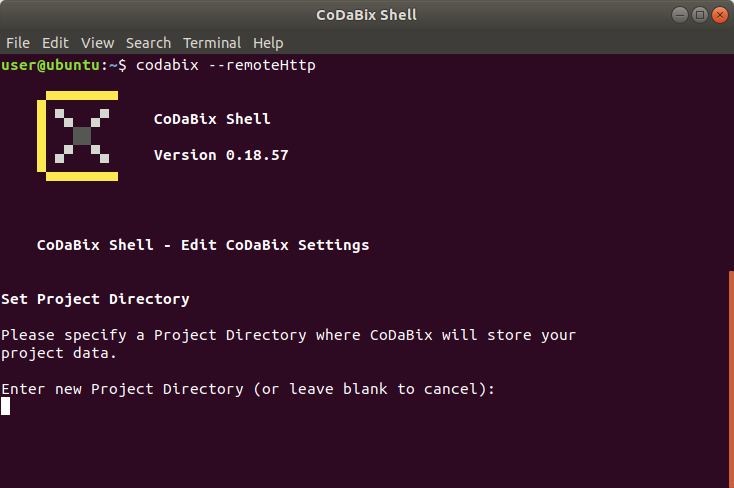
- Enter the full path where you want to store the Codabix project directory (usually a folder in your home directory) (see Codabix Project Settings). Then, press enter two times to apply the settings and restart Codabix.
- Codabix will now ask to reset the Admin password; please enter a new password here:
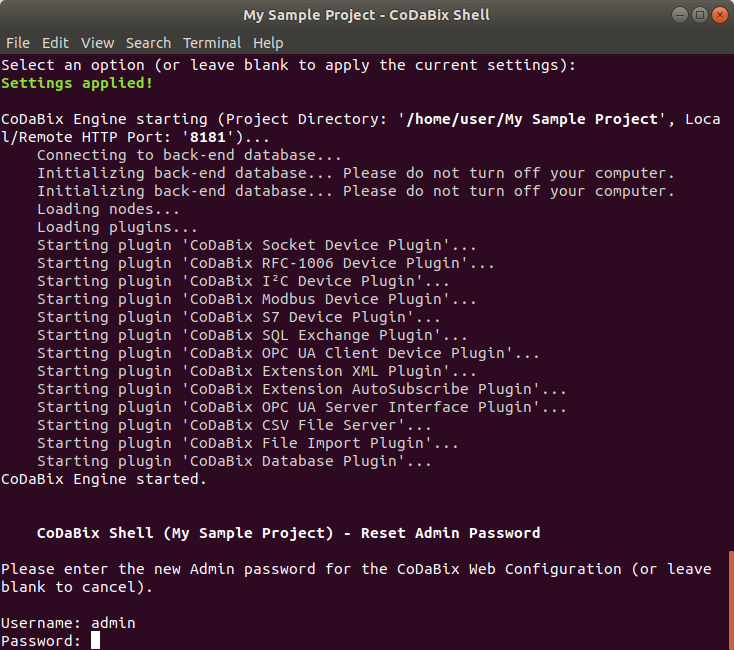
- Now, you can open
http://localhost:8181/config/in a browser on your machine (if your Linux distribution was installed with GUI) to open the Codabix Web Configuration, or you can usehttp://<IP-address>:8181/config/in a browser from another machine to access it over the network.
Run Codabix as a Service
Install Codabix as a Service
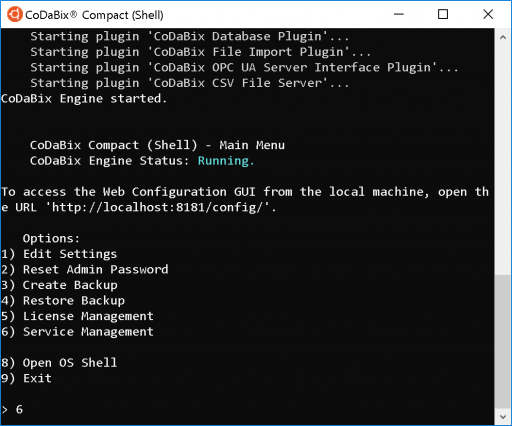
To install Codabix as a service, start the Codabix Shell by executing the following command:codabix
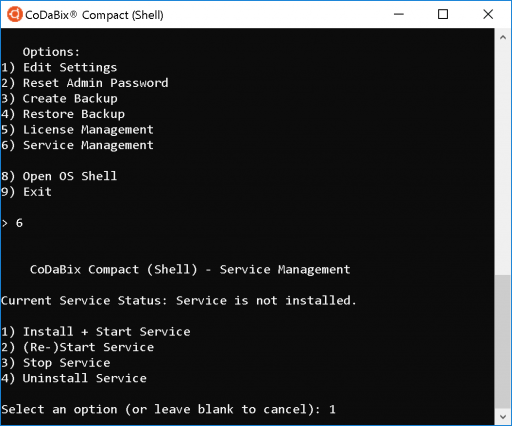
- Choose the option 6 from the command line menu to invoke the Service Management:
- By choosing option 1 in the Service Management you can now install and start Codabix as a Service:
- After successfully starting the service you will see the status Service is running on the command line:
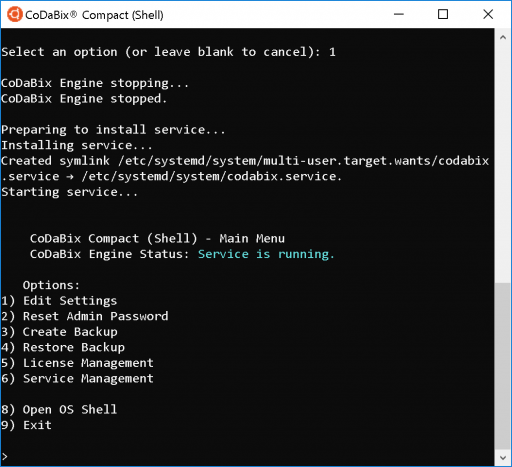
- Now you can close the Codabix Shell with 9 and the service will keep running in background.
- From now on the service will be automatically started in case of a reboot of the operating system.
Status of the Codabix Service
To retrieve the current status of the Codabix Service (Running, Stopped) start the Codabix Shell:codabix
The current status of the service will now be displayed:
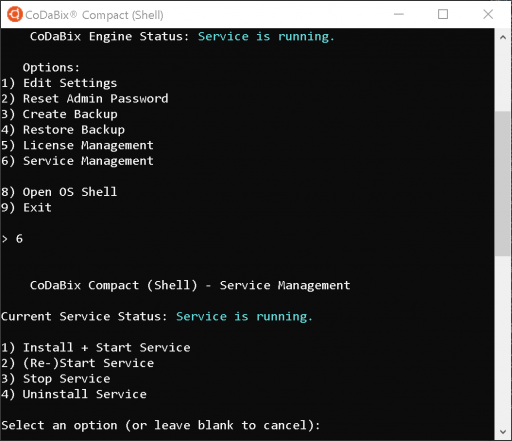
(Re-)start, stop and uninstall the Codabix Service
In order to (re-)start, stop, or uninstall the Codabix Service open the Codabix Shell:codabix
- Call the Service Management via option 6
- Now choose the requested funcion:
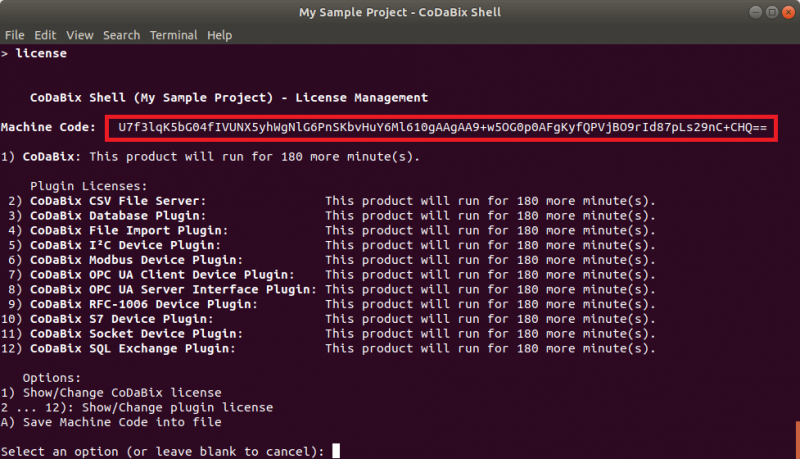
License Management
Machine Code
When you order a Codabix license, you will need to provide the machine code for the machine where Codabix is running.
To get the machine code, execute the following command on the command line (bash):
codabix --machinecode
This will output the local machine code to the terminal, for example:
$ codabix --machinecode
U7f3lqK5bG04fIVUNX5yhWgNlG6PnSKbvHuY6Ml610gAAgAA9+w5OG0p0AFgKyfQPVjBO9rId87pLs29nC+CHQ==
Alternatively, you can display the machine code in the Codabix Shell application, by entering license in the main menu to open the license management. The local machine code will be displayed at the top: